The lovely Mariposa Dress
I’ve already blogged over at the site of my colleague, Kelly Watson, about how Anna Maria Horner’s Amazon video for Handmade Beginnings totally sucked me in (and led me to create my own video)! On the video, Horner features the Mariposa Dress (and she is wearing it in the book). I knew at first glance that I absolutely HAD to make it. After all, since I was already pregnant, the timing was perfect!
I was intimidated by the pattern sheets at first, because there are multiple pattern pieces printed over top of each other. But it’s all color-coded, so actually, it was very easy to trace and keep track of. I make all of my pattern pieces out of Pellon Tru Grid because it’s easy to see through and work with. I decided to make the dress (not the tunic) and to follow the maternity directions (obviously). There is also an option to just make it an empire waist, without the extra space for a belly (in which case it still serves as a great nursing dress). The sizes are somewhat limited: it’s either small/medium or medium/large. (I chose medium/large, and when not pregnant, I wear either a size 8 or 10.)
My observations:
- I found the directions very clear. The only thing I had to take a second look at were the directions for shaping and cutting the rectangles for the bottom of the dress. You fold them to shape them (so you can shape both sides at once), but then you have to unfold them to cut, and then cut the whole rectangle on the fold. It seems obvious now, but at first I thought you were supposed to leave them folded in half to cut (something about the wording of how to place it on the fold confused me for a minute, but of course, it wouldn’t make sense to leave them folded to cut).
- The wrap ties—which I adore from a design perspective—are nonetheless a pain in the butt to work with, especially because they are constantly in the way. But such is the price for loveliness! Just take your time with them.
- I decided to make mine sleeveless (since it’s 10,000 degrees outside this summer) and I brought the arm holes in slightly. This added a bit of bulk at the shoulder seam, which I didn’t think through; I wish that I would have adjusted the spacing of the box pleats. But it’s not really a problem.
- I just finished the armhole edges with pre-made bias tape, since I wasn’t in the mood to make my own.
- It’s a bit short, so I just took the scantest of hems. If you’re tall (I’m 5’ 5-1/2”), you probably want to add more length (she does give you finished dimensions, so you can measure ahead of time and figure out your length).

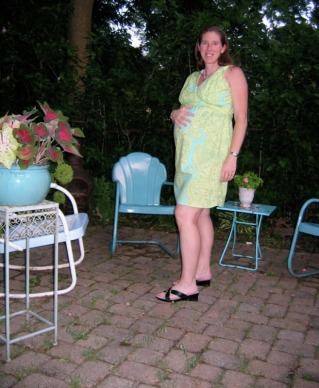
Wearing the dress at CHA
There is definitely room for a pregnant belly in this dress! I’m 35 weeks (and in no way small), and I wore it this past weekend at CHA. I actually got lots of compliments on it! I hope that I can still wear it after I have the baby; I’m worried it will be too long in the front, but I love this dress so much, I don’t want to give it up! The modesty panel (which comes together very easy) makes it ideal for nursing, so I definitely plan to make the tunic version after the baby comes.


 RSS Feed